Monday, February 10, 2014

Day 62 - Rainier finds his voice

A lovely little parcel arrived on my doorstep this morning!  My MartMod voice modulator was delivered by the friendly UPS man (maybe not friendly ... maybe not a man!  No-one was there when I answered the door.  Well, no matter.)!

After unboxing and snapping a pic of it for Ferrain's benefit, I packed it back up and begrudgingly went to my job, wishing that time would move faster so that I could go home and play with it some more.  I brought it with me to show to my friend Jeff, and to ask him some electronics-related questions.

At lunch time, we hit up a local Radio Shack and bought in-line fuse holders, 5V fuses, and a 12V power adapter for testing the unit out.  He invited me over to his place after work so that I could use the soldering iron to connect the necessary bits together.

On the way to his place, I stopped by Staples and bought a headset with microphone to plug into the headphone and mic ports on the MartMod.

He had a spare set of 4-ohm speakers in a computer parts bin that we salvaged.  We stripped wires, soldered things together, covered it all up with electrical tape, and followed Ferrain's instructions to the letter, including testing everything on a multimeter.  Then, after hooking up the speaker to the unit, plugging the XLR cable into it, and finally plugging in the power adapter (making sure all dials were set at the 11 o'clock position), we switched the modulator on.

All that remained was to get into character.  And here are the first words I've ever spoken as a proper, modulated Dalek:


Sunday, February 9, 2014

Day 59 through 61 - Icing on the cake (errr, dome plug)

I am tickled pink as I sit here typing this entry (however, most of it's Bondo, so it will eventually chip off, har har)!  I have spend the last few days working on adding filler to the dome plug, and what a fun little bit of drama this has been!

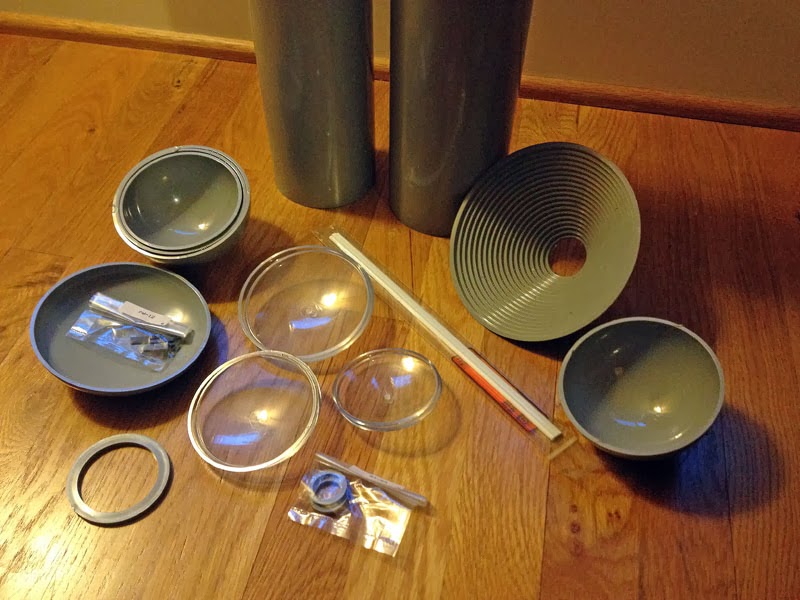
Ah, but before I begin, I received a package on Friday ... my Plastruct parts had arrived!  Everything appears to be in order except for one thing—the small rings at the bottom of the image are wrong.  Indeed, a few entries back, I inadvertently put the wrong inner diameter part.  It should be this one:

  • RI-40 (Qty. 2) - 1-9/16" O.D. x 1-1/4" I.D. ABS RING $1.40@ ($2.80 total) - small ring behind plunger

I don't know why I thought it was RI-24.  What a silly bunt.  Anyway, I am very happy that these pieces came.

Okay, enough of that.  Onwards!

To aid in the curing of the fiberglass resin layer I had added earlier, I ran upstairs and got a hair dryer.  I'm glad I got the extra-long threaded post to clamp it to!  After about four hours of it being on the low warm setting, the resin had cured!

The following day after curing under the hair dryer, the resin'd dome plug was nice and strong.  It was time for the first layer of Bondo.  I finished up the one small can that I had, so I had to crack open the second small can.  After that first layer had cured a bit (it doesn't take too long), I took my sureform rasp to it and filed down the rough spots, preparing it for a second layer.  I wanted to keep adding layers until I got close to the edge of the wooden former.

I ran out of Bondo in short order, so I went to get some more.  As I was out on errands, I saw a VW with the simple word "exterminate" on its boot.  An auspicious sign, indeed.  More Bondo was procured forthwith.  (Starbucks venti iced mocha added for scale.)

More layers followed.  More curing.  More rasping.

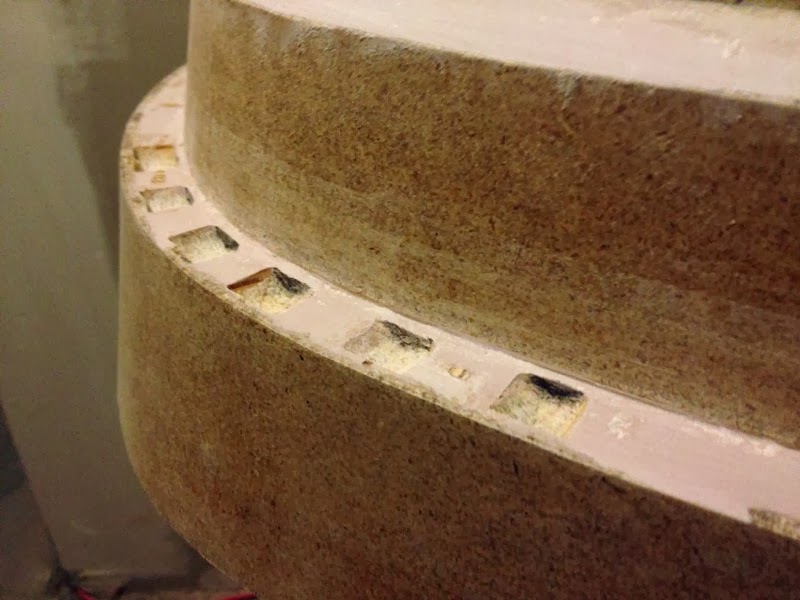
At around layer four, the Bondo had started to creep up to the edge of the former.  I decided to take a page out of ccain's build diary and add a 45° angle to the former.  This would allow me to drag the remaining Bondo layers across the surface of the dome plug instead of using my knife spreader.  I used my hand router (which still had the correct bit in it) to accomplish the angle.  I didn't want the MDF to get all gunked up with Bondo as I was doing this, so I added some painter's tape to the edge.

The first pass was a bit rough; I mixed up an extra big portion of Bondo and added it as fast as I could whilst spinning the plug base (not countersinking the t-nut underneath the platform turned out to be a blessing in disguise; I was able to spin the whole thing like a lazy susan while I held the former steady).  There was some drag because I think the Bondo started to go off a little early.  This was, I believe, the fifth layer of Bondo so far.

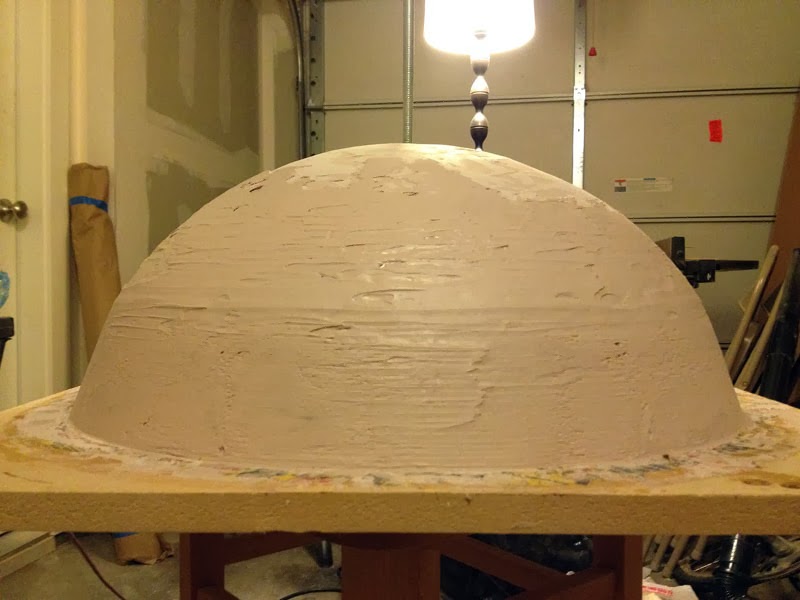
I waited for that to cure a bit, and then mixed up more filler for layer six.  Having learned how to pace myself better, I took this one a little bit slower and more deliberate.  I needed to just get a bit more of a defined angle between the dome's chamfered lower portion and where it started to curve upward.  I think I did a job well done, and only just need to sand it smooth and fill any remaining pockmarks.  I'll be unscrewing the rod and filling up the top part, as well.


All in all, I am extremely pleased with how this all went.  It really is a shame that, once the GRP mold is made from this part, all this will be going in the trash!  Michelangelo wept.

Thursday, February 6, 2014

Day 58 - Newspapering and fiberglassing the dome plug

The next steps for my polystyrene dome plug was to prepare it for being covered in strips of newspaper.  This is per AdamSt's post on Avonlea22's diary about how he made sections for his B9 robot, suggesting that this might be a faster way of making a dome plug.

I had to clean my sureform rasp by soaking it in rubbing alcohol overnight and then taking a BBQ wire brush to it.  It was gunged up with a mixture of foam and semi-dried wood glue, which, after being soaked in the isopropyl, came off of it in little balls in a consistency not unlike a dog's eye bogies.  Ick.

Once the rasp was clean, I trimmed the dome to be about 1/4" away from the edge of the wooden dome former.  Then I took the paint brush and started glazing sections of the dome with wood glue, applying torn-up strips of newspaper as I went.  Pretty soon, this was done, and I let it all sit to dry.

I went out and got a few yards of fiberglass tissue (also known as surfacing mat) and started to tear it up to layer it on top of the newspaper.  This will provide a thin layer of strength to the dome plug, on which I will later apply layers of Bondo.  I rubbed out the bubbles as best I could; the newspaper was already fairly bumpy.

It took me a long while to get the resin to react to the catalyst, probably because the garage is cold.  I hope that this stuff cures... it's been about an hour since I applied it, and the remnant that's in the jar is still fairly runny.  I wonder if I should buy a space heater for the garage to maybe speed up the curing process.

Sunday, February 2, 2014

Day 57 - Sculpting the styrofoam dome plug

This morning, I finished cutting the rest of the styrofoam.  The Seattle-ite in me is satisfied that I got to recycle styrofoam that I already had for the creation of this dome.  After the final piece was cut, I started sticking the layers together with some of my Titebond III wood glue.


Looking back, I should have used some other kind of adhesive, because even after a significant amount of drying time, the glue was still wet when I came back later.  Ah well, it still did the job, mostly.  I have to sand down my dome former piece again, however, since some of the wood glue dried to the profile edge.  I need it to be smooth for when I eventually start applying Bondo to this thing.

Using a combination of sureform rasp, sandpaper, hacksaw, and a wire BBQ grill brush, I sculpted and shaped the dome per the former's outline, until it eventually looked as pictured.  This took a couple of hours, with a couple of breaks thrown in for good measure.

More of Rainier's personality is starting to peering through the layers of MDF and plywood ...

... however, many pieces of styrofoam were lost in the line of duty tonight.


Next steps are to:

  • continue shaving the styrofoam to reduce the profile of the dome about 1/4" from the edge of the former
  • glue on newspaper to strengthen the overall shape of the dome plug
  • varnish the outside with fiberglass mat and resin (the glued newspaper will prevent the resin from melting the styrofoam)
  • Bondo/sand/Bondo/sand/Bondo/sand etc.

Wednesday, January 29, 2014

Day 56 - Dome former!

Taking a bit of a break from those ruddy shoulders, I decided to make my dome plug former.

I started out with the base, of course.  I wanted to have as level of a base as I could; I reasoned that I should use MDF instead of plywood because of the warping issues I ran into when building the fender.  I still had quite a bit of 3/4" MDF left over from making the neck rings, so I took it to the table saw and made a 2' x 2' square.

I went out to Lowe's, and the helpful hardware man there located some T-nuts for me to use on the threaded rod I had selected.  This made the rod quite perpendicular to the base when attached to both the top and the bottom.  One thing I forgot was to countersink the bottom one, but I'm okay with that.

(Oh, I should mention that when I selected the rod at Lowe's, I rolled it on the floor first to make sure that it was quite straight.  There were some there that had a slight bend to them, so I'm glad I tested a few out before choosing.)

Next was to apply the template I drew out earlier onto some additional 3/4" MDF.  First, I went to the table saw and trimmed everything to the minimum size it needed to be.  Then I went to the jigsaw and cut the curve and the chamfered edge.  Then I took 80-grit sandpaper and sanded to the line I had drawn to make it all nice and smooth.  Then I drilled a hole into the top.  I did this because I trusted the straightness of a drilled hole to the possibility of other solutions on the site not being so straight—namely attaching bent metal and bolting it to the former.  Also, it was easier for me to calculate where to drill the hole, and still have an even 26cm radius from the center of the threaded rod to the edge of the dome's parameter (the proper diameter of the NSD/Imperial Dalek dome).


I cut up ever-decreasing sizes of styrofoam that was left over from my bookcase, but it appears that I don't have enough.  Well, I have some thinner strips, and I can probably glue them on individually, which should be okay.  But I got bored, so I stopped, hehe.  I'll finish it all up later, but I may still have to buy a few more sheets at a craft store.  After this, I'll whip out the sureform rasp and start rasping away to make them into the dome form we're all so very familiar with.

So far, I'm very pleased.  If I take this one step at a time, I hope I get a very good dome out of this, indeed.  It's about time!

In other news, I bought a two-foot length of 1" aluminum pipe for the gun barrel from onlinemetals.com (specific item here), but the outer diameter is slightly bigger than the exact 1" hole machined into my two gun bosses. For tubing, I thought the tolerances would be stricter.  Not only that, it's inner diameter isn't a uniform .125", giving it an off-center look.  Overall, I'm disappointed, but at $5.00, you get what you pay for.

Someone suggested that it might be to do with the manufacturing process and whether the tube is "drawn" or "extruded".  Both types start as extruded tube, but then if more dimensional accuracy is required, the extruded tube is shaped by "drawing" the material through a die.  This process makes the tube stronger with a better surface finish and more accurate and constant dimensions than the equivalent extruded tube.


A brief search online, however, shows that the tube I bought is extruded, but there is a drawn option also available.  I ordered a 2' length of that, and I'll pick it up tomorrow.  It's about three times the price, but that's not too bad.

Monday, January 27, 2014

Day 53 through 55 - Golly, more sanding

Well, I think I've pretty much had it with the Bondo/sand/Bondo/sand business, at least for the shoulder section.  I'm getting too bogged down with it, and it's sapping my initiative and motivation for the other parts I have yet to build.  And, since most of this work is going to be covered up with the armored slats, I think I'm going to call this DONE.  I put a bit of sandable primer on the front, just to check to see how glaring the pockmarks are, and they're not too bad.  I have Bondo spot putty, but I haven't used it yet.

My issue is that when I apply a new layer of Bondo (to fill previously discovered holes or to strengthen thin, squishy sections), I seem to find more and more pinholes.  My garage is awash in pink dust.  So, I'm going to make a few more passes with finer and finer grit sandpaper (320 and 600 (wet)), then reinforce it with fiberglass on the inside seams, and then prime it up.

My friend Matt thinks the shoulders are ready-to-wear.  I agree, but after priming and painting.  ;)

To increase my motivation, I think I'm going to try to tackle the dome.  I went and got a couple of cans of gelcoat (expensive stuff!) and four yards of thick chopped strand fiberglass matting.  Then, I followed AdamSt's instructions on how to draw out the dome template.  I bought a bookshelf a few months back, and the box contained several huge 1/2" sheets of styrofoam which I will cut up and recycle for the majority of the plug body.  It looks like there should be enough.

Thursday, January 16, 2014

Day 48 through 52 - Bondo and sand, Bondo and sand, Bondo some more ...

So, it's been months, and I think I've racked up about five-ish days worth of Bondo and sanding in that time (honestly, I've lost count).

I applied some initial Bondo to the shoulders in November, mostly to the lower, flat area, and the part at the bottom of the front trapezoid.  Also covered were the upper and front areas of the gunboxes and the angled upper portion between them.  Once dried (and probably a few days or weeks later), I sanded them down with a combination of sureform rasp, file, 80-grit sandpaper, and orbital sander with 120-grit pad.

Some weeks later, I Bondo'd and sanded the top of the shoulders. No pic of that.

Forward the clock (or travel by TARDIS) to this month, just a few days ago.  I dremeled down the angled foam and applied more Bondo.  I also applied Bondo to the gunbox recesses with my finger.  This was sanded down a day later or so with the same tools listed above.  The gunbox recesses were sanded using a torn-off section of 80-grit all rolled up to the size of a pencil.

I thought I had trimmed enough of the foam down to make a fairly thick layer of Bondo (per Avonlea22's advice), but running my finger along the flat area I had sanded down months ago, I discovered that the Bondo layer was a little squishy.  I dremel-sanded down those thin areas between the spacers that were the squishiest and re-Bondo'd them tonight.

Also tonight, I trimmed off the upper corners of the trapezoid (and the weird areas behind the gunboxes) using the dremel and a box cutter, because they were also kind of squishy with the foam underneath.  Then I flipped the shoulders upside down and re-Bondo'd them.

Finally, since the whole thing was flipped, I Bondo'd the bottom of the shoulders.  So, now, all of that is curing.  I'll need to sand and put at least another layer on pretty much everything and sand, just to get all the lines tidy and bits ready for priming.  Ugh, this part is so bleargh.

One minor travesty—since I keep everything stacked up (fender, skirt, and shoulders, at least), I was at one point standing on the fender without really realizing it as I was working on some close Bondo detailing.  I heard a *crack*, and looked down.  One of the sections of the fender had separated from the one adjacent to it.  I think this was due to the interior of the fender not yet being reinforced with fiberglass tape.  I'm not too bovvered, though; when I get round to applying the fiberglass, I'll re-glue it the night before.