I managed to pull myself away from playing Diablo III long enough to continue with more shoulder slat work. Darn video games stealing my precious time!
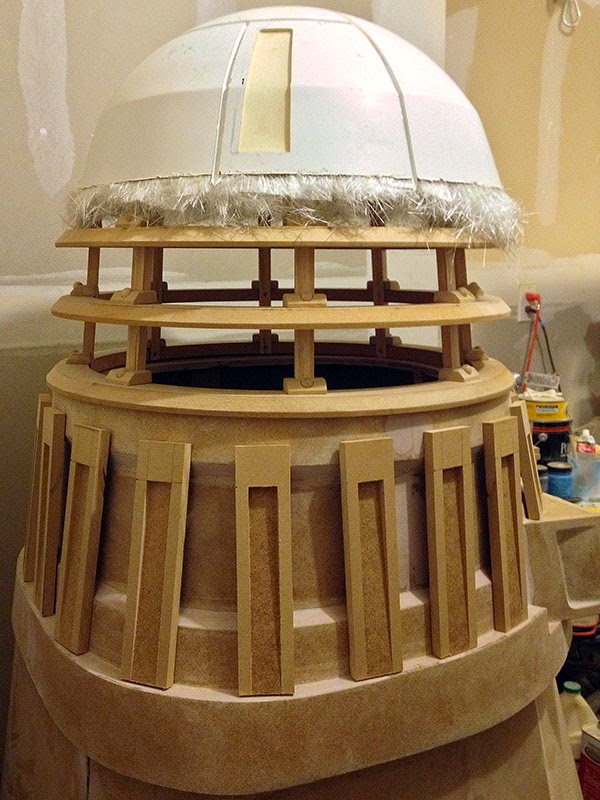
The first order of business was to take off all the clamps from the slats and see how it all went. I positioned the slats on the shoulders to get a glimpse of what it's all eventually going to look like. I liked very much what I saw. I kind of regret not making the initial slat wider and cutting rebate (rabbet) grooves to prepare for the side pieces—like I did on the gunboxes—but we will see what happens when I get to that point. (Rainier looks a bit like Mr. Burns from the Simpsons, doesn't he? I need to trim his hair.)
Since I used the thin hardboard to make the diagonal center piece in each slat, I needed to put something on the back to allow a deep enough hole to be drilled for the bolt and decorative chrome cap. The center piece of the slat measures approximately 5°, so I made some MDF wedges that would match that angle and also fit into the groove. I glued and clamped these in place and let them dry.
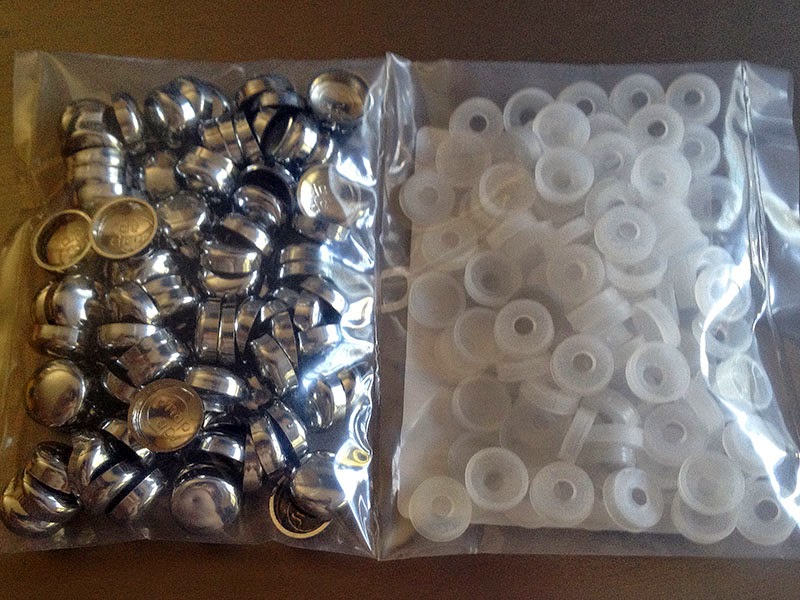
I found these nifty things called Snap Caps from a company called Pro-Dec (http://www.pro-dec.com), and ordered 100 of their 5/8" chrome caps. The caps "snap" over a corresponding plastic washer, which is held in place by a screw or bolt. I ordered 100 of the Flat Bottom "A" washers which will fit an M5 bolt, but you can get a larger hole size that will fit an M6. All together, these 200 parts cost me $35.00.
I had a 5/8" forstner bit I was going to use for drilling the bolt holes. I tested this out on a scrap piece of MDF, but it was too tight of a fit, and the cap would always get lodged in the hole at an angle. I needed a slightly bigger forstner bit, but the next size up I had on-hand was 3/4". That was too big. I needed something in between, an 11/16". A search of the Lowe's website revealed that they didn't have that bizarre size.
I had heard from my friend Jeff about how he bought RAM for his computer through Amazon Fresh (normally used for home-delivered groceries), and it was delivered same-day to his door. I decided to try it out, and see if I could get an 11/16" forstner bit delivered to me. And I'll be damned if it didn't work. They happened to have one in stock, and about four hours after placing the order, I got my bit delivered right to my door. Magic.
By this time, the wedges had dried, and I went back into the garage to continue working. After measuring where the two holes should be drilled (2cm from the top and bottom for each slat), I made a quick jig on the drill press using scrap wood and clamps to hold the slats in place. I also locked the drill depth to ensure each hole was about 3mm deep or so, and proceeded to drill each slat. The wedges I had put into place worked a treat; the depth of the hole did indeed go through the angled HDF board.
Once that was done, I swapped out the forstner bit for a regular drill bit that fit the hole in the snap cap washer (I'm guessing it was somewhere close to a 5/32" bit), and drilled the rest of the way through the slat.
After all that was done, I did a test assemblage of the cap and washer with a random machine screw I found that just happened to fit the drill hole. The cap snapped into place and was secure without the need for glue! This means I can have access to the bolt heads whenever I need to (which may be never, but whatever). I need to go out and get shorter bolts or screws for when I attach the slats to the shoulders so that I don't scrape my arms to pieces when I'm sitting inside Rainier. But I think that these will do the trick, and I'm very happy with the result.
Next up is to make the sides of the slats. I have a feeling I will be fighting my procrastination tendencies for this part of the job, since each side piece will be pretty much custom. I can't cookie-cutter this, since the shoulders are not all completely even or perfectly symmetrical. So it will be slooooow going.


