I found some stuff called Bondo Bumper and Flexible Part Repair, which is a rubbery version of Bondo spot filler. It also uses a catalyst to activate it, but they are used in equal parts. Then you smear it on. Also, it smells like burning tires, yuck! A few applications of this goop filled up the gaps between the linoleum pretty nicely.
After that cured—which was pretty quick—I took out the Minwax oil-based polyurethane varnish that I had also used to coat and seal my dome plug months ago. I applied a couple of coats every 4-6 hours or so, around the time each coat got tacky. Then I left it to dry overnight. In the morning, I noticed that it was still tacky, so I left it sit while I was at work. Still tacky. After chatting with acrodrome, I learned that there was no area for the oils in the varnish to soak into, linoleum being non-porous. I was thinking that I needed to clean the whole thing off with mineral spirits, or, worse, scrap it all and start over. For the third time. But then, the weather turned very sunny, and I left it out in the brilliance for several more hours. It finally cured!
(In hindsight, I probably didn't even need to do this step. I remember when I had applied the rubber panels during my second dome attempt, and had neglected to even spray release agent into them, and they turned out just fine in the end. Rubber and gel-coat seem to work well together.)
So, after that, I sprayed it down with silicone release agent and mixed up a small batch of gel-coat with some dye in it. I added the catalyst, stirred, and sponged it on pretty liberally. And, after a few minutes from finishing up, those weird chemical reactions happened again, like what happened when I was making the dome plug months ago. So strange. I wonder if it's the Minwax that somehow causes it.
While that was getting nice and tacky, I tore off some pieces of surfacing veil and chop mat from their respective rolls. I was really hoping that I wouldn't run into a problem with air bubbles given all the sharp angles. It was starting to get darker outside, so I didn't let the gel-coat get as tacky as I would have normally wanted it.
I spent most of the early evening and night applying the glass—two layers of the surfacing veil, and two layers of the chop mat (give or take). I tried to work out the air bubbles as much as possible, and give good coverage to the cowl plug (especially on the sharp corners). I put it back in the garage, turned on the heater, and left it to sit for another 24 hours.
I guess we'll see how it turns out tomorrow! *crosses fingers*
Monday, July 28, 2014
Monday, July 21, 2014
Day 86 through 88 - Dome cowl
Back at the beginning of June, I started to make the dome cowl. I was originally going to follow ccain's method of using cardboard, but when I started to Bondo it, I was running into many frustrations. First, I just don't do a very good job of sanding detailed pieces. Second, the duct tape I was using to attach the pieces of cardboard onto the cowl were not flush with it, so the arc of the cowl was lifting off of the dome's arc.
So, fast-forward to now. I took a big break from Rainier (mostly to enjoy two full weekends of other activities and travel), and have been coming back to him slowly. I had lunch with a friend when it hit me: I don't need to use cardboard! I could totally use rubber sheets like I used for the details in the dome! Even when forgetting to apply release agent, the cured gel coat let go of those details perfectly! This will be perfect for the dome cowl!
I went to Blick, a craft store here in the States, and looked around for suitable rubber. I needed bigger pieces than the plumber's rubber that I had found at Lowe's for the dome details. I was directed down an aisle, and I found large linoleum rubber sheets that were nearly 5mm thick. I bought these, a mat cutter for slicing them up, and some stronger spray adhesive than what I had before. (I didn't want a repeat of the rubber panels sliding off while gel coat was smothered over them.)
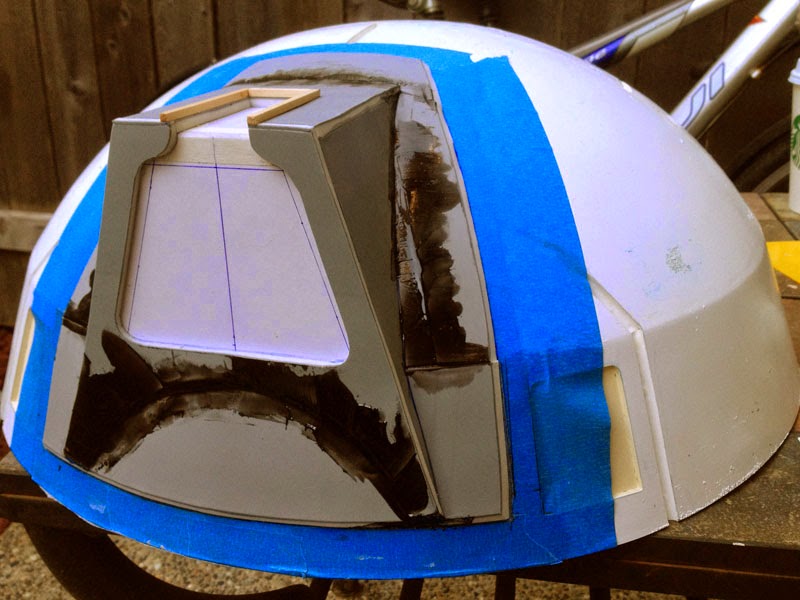
Back at home, tore off the old mess of a cowl, leaving the painter's tape attached to the dome. I made paper templates to get the general shapes I needed for the new linoleum version. The linoleum cut like a dream with the mat cutter, and in fairly short order, I had the main outline of the cowl base cut out. I sprayed some adhesive onto the backs and onto the painter's tape attached to the dome, and let that get tacky. Then started I attaching the pieces.
Even the stronger version of the spray adhesive was still not sticky enough, and some of the pieces were lifting off of the painter's tape. However, a little brushing of Krazy Glue solved that problem.
I remade a cardboard structure—this time a little smaller than the plans to taking into account the thickness of the linoleum—for the interior of the main cowl piece. This is because the linoleum is very bendy; it's basically like rubber. I needed a stiff inner structure to adhere to the outer pieces. Then I drew out and cut the front, top, and sides, similar to how I did it back in June. Spray adhesive and Krazy Glue kept it all together.
Eventually, everything was attached to the dome. I am extremely pleased with the result, and how sharp the details are. I still need to fill in gaps between the various linoleum pieces, but I'm not sure if Bondo is the way to go, since the linoleum substrate is so rubbery and flexible. I just learned about another filler called Dolphin Putty that is used for repairing rubber car bumpers, so that might be a thing to try. It's also sand-able and paintable. After that, I'll probably throw a few coats of polyurethane varnish—goodness knows I still have a whole gallon of the stuff.
(Note that the front piece has a large semi-circle cut out from the bottom. This was inspired by MrsCarleigh's 80% scale Dalek cowl. I didn't like the way the front of my old Bondo version bulged out. This semi-circle will also be filled in and smoothed. Also, I will be attaching the name tag piece in the eventual mold rather than on this cowl plug.)
OH! And I would be completely remiss if I didn't mention that ChristmasDalek was kind enough to take my gazing globes in for powder-coating, in exchange for the Imperial dome that I made for her several weeks ago. They turned out to be gorgeous!
Subscribe to:
Posts (Atom)